如何寫一個簡單生成 QR Code 的 Android APP 呢?其實只要引用 zxing.BarcodeFormat、zxing.WriterException 和 barcodescanner.BarcodeEncoder 這三個元件就可以做到啦!佈局上我們只要拉一個 EditText 用來輸入要轉換成 QR Code 的文字,再拉一個 Button 用來點擊後生成 QR Code,最後再拉一個 ImageView 用來顯示生成的 QR Code,這樣就完成一個簡單的 QR Code 生成 APP 的佈局啦!接著在 MainActivity 寫 JAVA 主程式就搞定啦!接下來要一步步教大家寫出來:
首先 build.gradle(app)內要在 dependencies 加上下面這一行才能運作唷!
implementation 'com.journeyapps:zxing-android-embedded:3.4.0'接著要到 activity_main.xml 內寫佈局,這邊提供 XML 給大家:
<?xml version="1.0" encoding="utf-8"?>
<RelativeLayout xmlns:android="http://schemas.android.com/apk/res/android"
    xmlns:app="http://schemas.android.com/apk/res-auto"
    xmlns:tools="http://schemas.android.com/tools"
    android:layout_width="match_parent"
    android:layout_height="match_parent"
    tools:context=".MainActivity">

    <LinearLayout
        android:id="@+id/linear_layout_top"
        android:layout_width="match_parent"
        android:layout_height="wrap_content"
        android:layout_alignParentTop="true"
        android:layout_marginLeft="8dp"
        android:layout_marginTop="8dp"
        android:layout_marginRight="8dp"
        android:orientation="horizontal">

        <EditText
            android:id="@+id/input"
            android:layout_width="wrap_content"
            android:layout_height="wrap_content"
            android:layout_weight="1"
            android:autofillHints=""
            android:hint="@string/input_hint"
            android:inputType="text" />

        <Button
            android:id="@+id/button_ok"
            android:layout_width="wrap_content"
            android:layout_height="wrap_content"
            android:layout_marginStart="8dp"
            android:layout_weight="0"
            android:text="@android:string/ok" />
    </LinearLayout>

    <ImageView
        android:id="@+id/image_view"
        android:layout_width="match_parent"
        android:layout_height="match_parent"
        android:layout_below="@+id/linear_layout_top"
        android:layout_margin="8dp"
        android:layout_marginStart="8dp"
        android:layout_marginEnd="8dp"
        android:contentDescription="@string/qrcode" />

</RelativeLayout>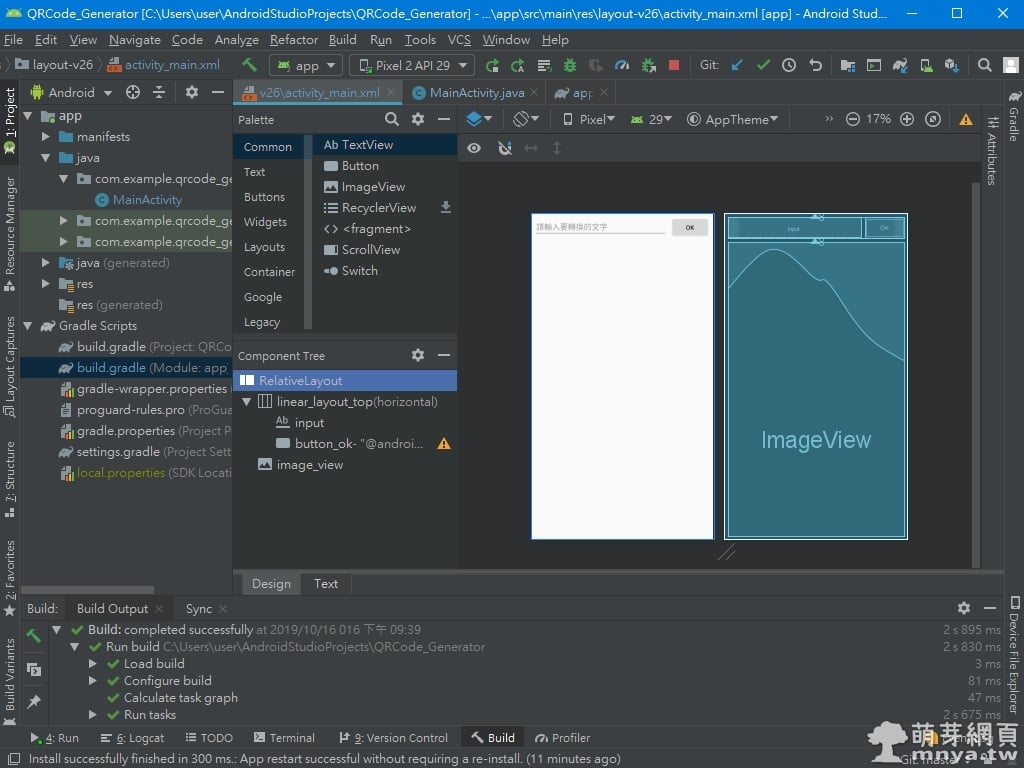
▲ 設計模式來看是長這樣,最外部用 RelativeLayout 當作主框架。
接著到 MainActivity 寫 JAVA 主程式,先來看看截圖:
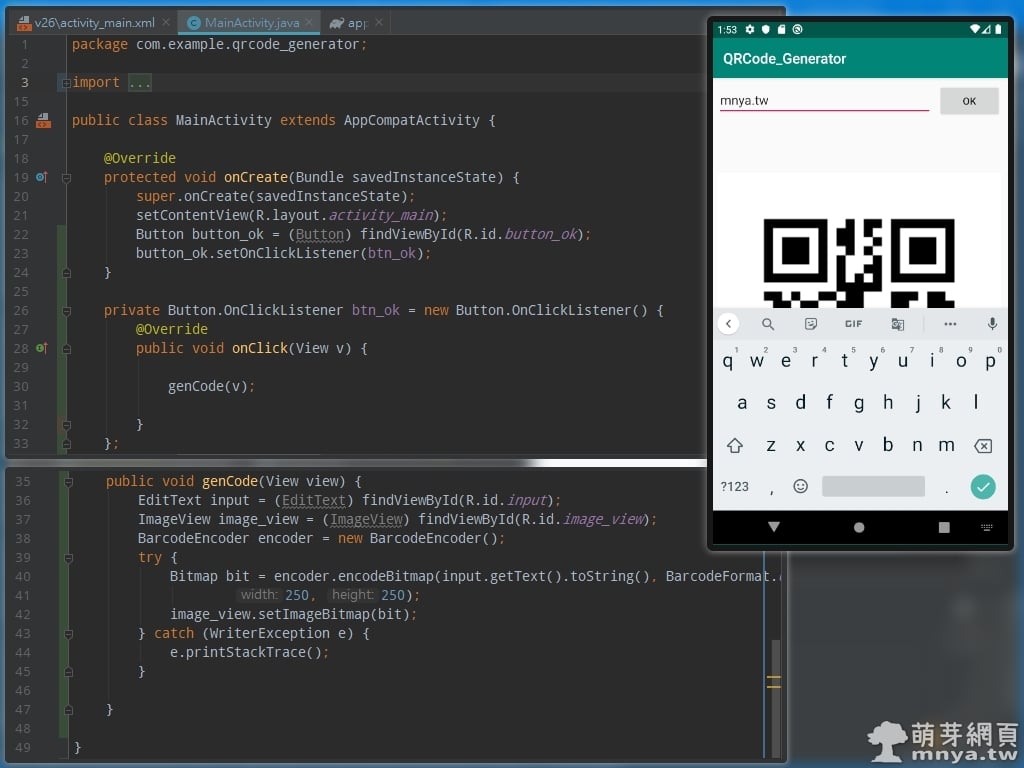
▲ MainActivity 內程式碼的完整截圖,右邊附模擬器運作截圖。
首先是 onCreate(Bundle savedInstanceState) 的程式碼:
Button button_ok = (Button) findViewById(R.id.button_ok);
button_ok.setOnClickListener(btn_ok);
這邊只是放上按鈕監聽的呼叫,所以接下來要寫按鈕點擊要做什麼的程式:
private Button.OnClickListener btn_ok = new Button.OnClickListener() {
        @Override
        public void onClick(View v) {

            genCode(v);

        }
    };
好啦!按鈕點擊後會去呼叫 genCode 方法,那接下來就是這方法的程式碼:
public void genCode(View view) {
        EditText input = (EditText) findViewById(R.id.input);
        ImageView image_view = (ImageView) findViewById(R.id.image_view);
        BarcodeEncoder encoder = new BarcodeEncoder();
        try {
            Bitmap bit = encoder.encodeBitmap(input.getText().toString(), BarcodeFormat.QR_CODE,
                    250, 250);
            image_view.setImageBitmap(bit);
        } catch (WriterException e) {
            e.printStackTrace();
        }

    }
這樣就可以將 EditText 內的文字讀取進程式內轉成 QR Code 並輸出在 ImageView 上顯示啦!這邊的 250, 250,前面是寬;後面是高,用來決定輸出的 QR Code 有多大張,這個就看開發者需求而定囉!😉
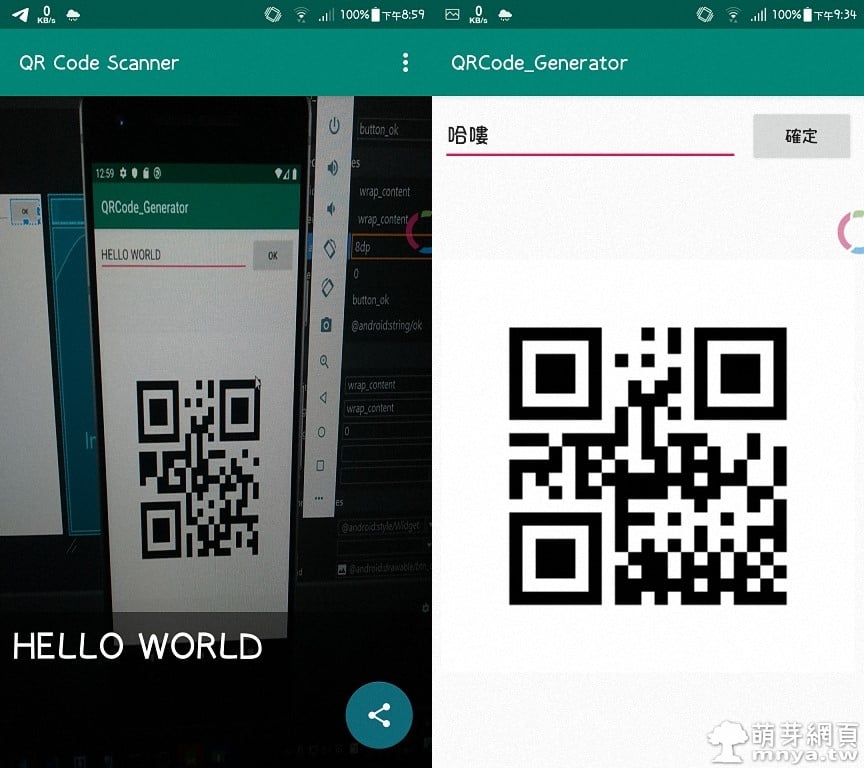
▲ 一些實際運作的截圖與範例,供大家觀看實際運作的樣子~


 《上一篇》【咖波環保周邊】咖波矽膠杯蓋(250元)
  《下一篇》SourceTree:免費的圖像化 Git 版本管理客戶端


留言區 / Comments
萌芽論壇